Overkill Your Monolithic Spring Boot App With Jenkins Pipeline
You can’t really call yourself a software developer if you’ve never overkilled your monolithic application—with fewer than 10 active users per hour—by throwing sophisticated tools at it just to make a simple app delightfully complex. So if you haven’t yet automated your straightforward deployment process with Jenkins, this article might be just what you need.
In this post, I’ll walk you through how to achieve the following pipeline stages using Jenkins:
- Choose which environment to deploy to
- Clone your repository
- Build your project (in my case, a Java Spring Boot app using Maven)
- Migrate your artifacts to server (in my case Windows server)
- Deploy/run your artifacts in the server via ssh
Pre-requisites
- Jenkins installed. If you’re using Ubuntu, you may refer tutorial online here : https://www.jenkins.io/doc/book/installing/linux/
- OpenSSH installed on both your Ubuntu machine and Windows Server. I’m using SSH key-based authentication instead of username/password. A good guide can be found here: https://www.digitalocean.com/community/tutorials/how-to-configure-ssh-key-based-authentication-on-a-linux-server
- Your Build Tools or your project framework installed. In my case since I’m using maven and Spring Boot, so I already installed Maven and Java in my Ubuntu OS.
- You have this Jenkins Plugin installed:
- Build Timeout
- Pipeline
- SSH Pipeline Steps
The Scripts
If you are well setup, now let’s proceed with the scripts.
-
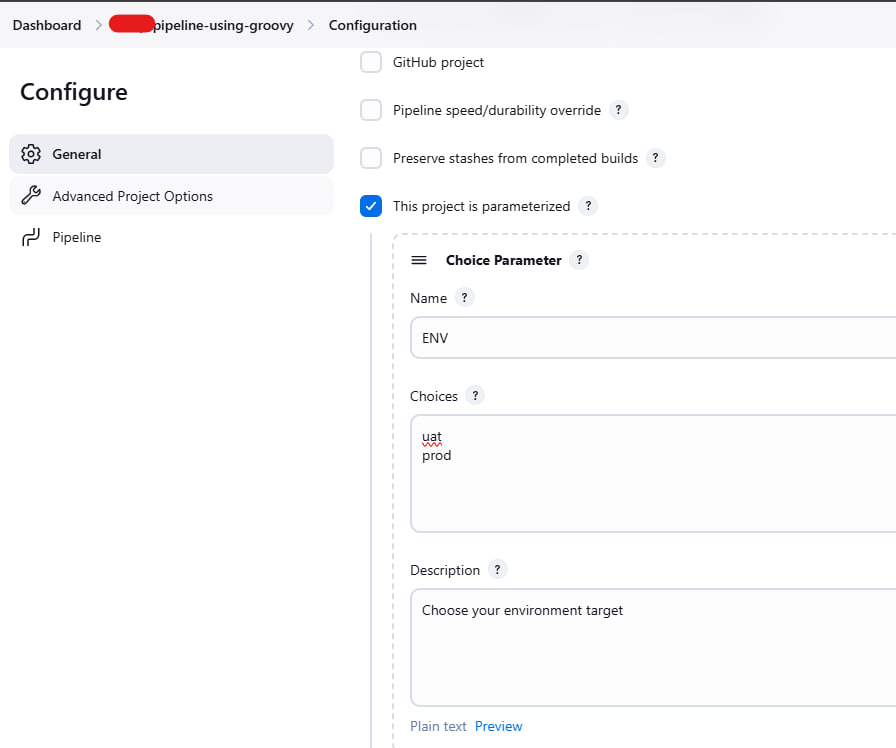
Choosing which environment to Deploy Let’s say you want to deploy either to UAT or PROD. For example you can choose whether you want to execute the pipeline on the UAT environment or PROD environment. In your Jenkins web, go to your Jenkins pipeline job > Configure > Tick This project is parameterized and name your environment as my picture below. In my case I only have two env which is uat and prod
-
Declaring your variables based on environments
1
2
3
4
5
6
7
8
9
10
11
12
13
14
15
16
17
18
19
20
21
22
23
24
25
26
27
28
29
30
31
32
33
stage('Init') {
            steps {
                script {
                    if (params.ENV == 'uat') {
                        env.GIT_REPO = 'YOUR_GIT_REPO'
                        env.GIT_BRANCH = 'YOUR_GIT_BRANCH'
                        env.BUILD_COMMAND = 'mvn install -DskipTests'
                        env.ARTIFACT_FILE = 'YOUR_ARTIFACT_FILE_NAME'
                        env.ARTIFACT_PATH = 'target/*.jar'
                        env.SERVER_USER = 'YOUR_SERVER_SSH_USERNAME'
                        env.SERVER_IP = 'YOUR_SERVER_IP_ADDR'
                        env.DEST_DIR = 'YOUR_PROEJCT_PATH'
                        env.JAVA_HOME = 'JENKINS_JAVA_PATH'
                        env.MAVEN_HOME = 'JENKINS_MAVEN_PATH'
                        env.CLEAN_COMMAND = 'mvn clean'
                    } else if (params.ENV == 'prod') {
                        env.GIT_REPO = 'YOUR_GIT_REPO'
                        env.GIT_BRANCH = 'YOUR_GIT_BRANCH'
                        env.BUILD_COMMAND = 'mvn install -DskipTests'
                        env.ARTIFACT_FILE = 'YOUR_ARTIFACT_FILE_NAME'
                        env.ARTIFACT_PATH = 'target/*.jar'
                        env.SERVER_USER = 'YOUR_SERVER_SSH_USERNAME'
                        env.SERVER_IP = 'YOUR_SERVER_IP_ADDR'
                        env.DEST_DIR = 'YOUR_PROEJCT_PATH'
                        env.JAVA_HOME = 'JENKINS_JAVA_PATH'
                        env.MAVEN_HOME = 'JENKINS_MAVEN_PATH'
                        env.CLEAN_COMMAND = 'mvn clean'
                    }
                    echo "Deploying to ${params.ENV}"
                    echo "Deploying to ${env.SERVER_IP}"
                }
            }
        }
-
Cloning your repository I’ve already configured my Git credentials (GitHub token in my case) in Jenkins. You may go to your Jenkins Dashboard > Manage Jenkins > Credentials. Save and get the credentialsId generated by Jenkins to clone the repo securely..
1
2
3
4
5
6
7
8
9
10
11
12
13
14
stage('Clone') {
            steps {
                echo 'Cloning repository...'
                checkout scmGit(
                    branches: [[
                        name: env.GIT_BRANCH
                    ]],
                    userRemoteConfigs: [[
                        credentialsId: 'YOUR_GIT_CREDENTIALS_ID',
                        url: env.GIT_REPO
                    ]]
                )
            }
        }
-
Build your project Now, build your Spring Boot app using Maven. The fat jar will be generated in target/ within the workspace.
1
2
3
4
5
6
7
8
9
10
11
12
13
14
15
16
17
stage('Build') {
            steps {
                echo 'Building the project...'
                script {
                    sh """
                 export JAVA_HOME=${JAVA_HOME}
                 export MAVEN_HOME=${MAVEN_HOME}
                 export PATH=\$MAVEN_HOME/bin:\$PATH
                    echo $PATH
                    ${CLEAN_COMMAND}
                    mkdir -p target/classes/static/app
                    ${BUILD_COMMAND}
                    mv target/*.jar target/${ARTIFACT_FILE}
                 """
                }
            }
        }
-
Kill your existing running jar in server Before deploying the new artifact, make sure you kill any previously running instance on the server. You don’t want to keep your zombie processes alive.
1
2
3
4
5
6
7
8
9
10
11
12
13
stage('Kill Existing Services first') {
         steps {
             echo 'Deploying the application...'
             sshCommand remote: [
                 name: 'ANY_VALUE',
                 host: 'YOUR_SERVER_IP',
                 port: 22,
                 user: 'Administrator',
                 identityFile: '/var/lib/jenkins/.ssh/id_rsa',
                 allowAnyHosts: true
             ], command: "cd C:/${DEST_DIR} && echo \"Killing existing services and delete existing jar using Jenkins On %DATE% %TIME%...\" >> deployment.log && wmic Path win32_process Where \"CommandLine like '%${ARTIFACT_FILE}%'\" Call Terminate && del ${ARTIFACT_FILE}"
         }
     }
-
Migrate artifacts to server Here I’m migrating the artifact to the server via scp.
1
2
3
4
5
6
7
8
9
10
stage('Transfer Artifact') {
            steps {
                echo 'Transferring artifact to the server...'
                script {
                    sh """
                    scp ${ARTIFACT_PATH} ${SERVER_USER}@${SERVER_IP}:${DEST_DIR}
                    """
                }
            }
        }
-
Execute your deployment commands in your server Now time to run your deployment script. For me it simple as running the jar file, make sure the log is coming and there is no error thrown in the logs. Since I’m using Windows Server, I need to find a workaround where the issue is the javaw -jar command will keep running all the time and the pipeline can’t be stopped otherwise the java process in the server also will be killed. So I need to create a timeout once the jar successfully running after 1 minute just mark the build as success .In Linux you can achieve this using nohup or any other tools to make the javaw -jar running in background and didn’t affect your pipeline.
1
2
3
4
5
6
7
8
9
10
11
12
13
14
15
16
17
18
19
20
21
22
23
stage('Deploy') {
            steps {
                script {
                    try {
                        timeout(activity: true, time: 1, unit: 'MINUTES') {
                            echo 'Deploying the application...'
                            sshCommand remote: [
                                name: 'ANY_VALUE',
                                host: 'YOUR_SERVER_IP',
                                port: 22,
                                user: 'Administrator',
                                // credentialsId: 'uat', // Ensure this matches your Jenkins credentials ID
                                identityFile: '/var/lib/jenkins/.ssh/id_rsa',
                                allowAnyHosts: true
                            ], command: "cd C:/${DEST_DIR} && echo \"New Deployment Using Jenkins On %DATE% %TIME%...\" >> deployment.log && javaw -jar ${ARTIFACT_FILE} > NUL 2>&1"
                        }
                    } catch (org.jenkinsci.plugins.workflow.steps.FlowInterruptedException e) {
                        echo 'Timeout occurred, marking as SUCCESS'
                        currentBuild.result = 'SUCCESS' // Ensure the build is marked as success
                    }
                }
            }
        }
-
Post Build Execution Just a simple one, print the status of the pipeline execution at the end:
1
2
3
4
5
6
7
8
post {
        success {
            echo 'Pipeline executed successfully!'
        }
        failure {
            echo 'Pipeline execution failed!'
        }
    }
The full script of this can be found in my gists here: https://gist.github.com/syamil24/fb7ec6bc81e7ca62aeaed32b6467872d
Are you done overkilling your application
This pipeline is especially useful if you’re just getting started with Jenkins and want a quick and dirty (but functional!) way to deploy your Spring Boot app. Most likely, your app is hosted on a Linux server — feel free to tweak this pipeline to fit your environment. There are a lot of other things you can explore too:
-
Jenkins Agents for better scalability and security
-
More advanced plugins and tools
-
Using configuration management (e.g., Ansible)
-
Dockerizing your deployments
But hey, one overkill at a time. Happy scripting! 🚀